Archive

HNC

We had a meeting this evening with the fashion students (‘clients’).  Because I am secretary for my cricket club I have been to many, many very boring meetings and wanted to make sure we had a bit of a framework to work to.  So I produced an agenda, as shown below with a brief summary of what was dicussed:

1. Hello! Everyone know everyone else?!  – Just simple introductions.

2. What do fashion students want/need out of this? – Images for portfolio’s.  Especially Gemma who has an online portfolio.

3. What do photo students want/need out of this? – Images for hand-in and portfolio’s as well as the whole fashion shoot experience.

4. Communication, email ok? Swap mobile no’s? – We already had a few email address’ just needed to clarify Nicole’s email address, that had a random underscore at the end!

5. Logistics, all drive? Relying on busses? –  Nicole does drive, but lives very close to Malcolm.  Gemma doesn’t drive and lives in Melton, but can get lifts if needed.  Could be an issue.
6. Proposed dates, anyone got holiday etc. – Everyone was ok with weekend shoots, Gemma and Nicole do some weekend work, but can swap with notice.  Out studio session had already been booked for 6th November, so need to get moving!
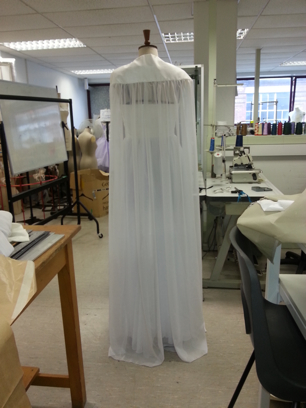
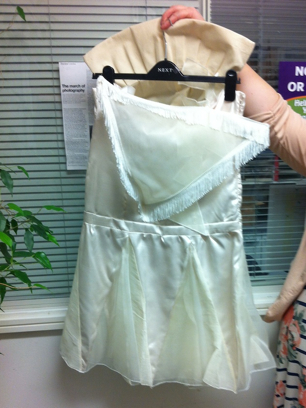
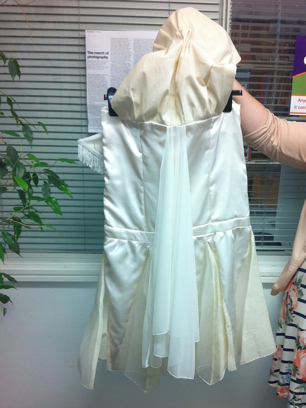
7. Proposed idea’s? – Gemma and Nicole had brought their coursework and dresses in with them, so could talk about the idea’s behind them.  Gemma had gone for a natural look, long flowing lines.  Nicole had gone for 1920’s-30’s flapper girl.

Is there a particular look or brand that is to be achieved? – Flapper girl for Nicole’s dress

If we decide on outside venue’s do we have a contingency for bad weather? – Lindsay did had a venue in mind that he’s walked and driven past before.  Private land, he would try and contact the owner.

Changing area for models? – Lindsay suggested the back of his builders van for an outdoor shoot!  We hoped we could find a room or a ladies loo for an indoor venue.

8. Costs? Expenses etc? – We decided that we’d split any major costs between us, small items we’d take care of ourselves.

9. Info for models, I.e. Shoes, accessories, makeup etc? – Gemma and Nicole had people in mind for their dresses and were happy to do makeup.  Models needed to bring shoes.  Gemma’s model needed to bring some white underwear to avoid being exposed!

10. AOB and further discussion of idea’s – Lindsay continued to describe the private estate that he’d walked around.  Because the weather hadn’t been great recently we were also trying to think of indoor venues.  After seeing an image of a model in front of patterned wallpaper, which everyone liked. Suggestions were: Beaumanor hall, City Rooms, New Walk Museam, Prestwold Hall, Calke Abbey, Grand Hotel and the Guild Hall.  Malcolm agreed to investigate the indoor locations. 

Overall a good meeting.

As part of our business unit we have been asked to work with fashion students from the college and photograph models in white dress’ that they had previously made.  I was actually in New York when the brief was set, but have been put in a group with Lindsay and Malcolm.  We have been assigned to Gemma and Nicole.  The business part of the unit is treating Gemma and Nicole as clients, i.e. have meetings, create dummy quotes, contracts, invoices etc..  We have a meeting booked with them on the 9th October to discuss and see coursework.

We were emailed pictures of the dress’ so this is what we will be working with:

Gemma’s dress looks to be quite tall and elegant.  Although we were a little worried about how transparent the skirt appears to be!


Gemma FrontGemma Back

Nicole’s dress worried us a lot, because of how short it appears to be!


Nicole Front

Nicole back

I took my National Identity First Shoot Images into college and got some positive feedback as well as idea’s for improvement.  It ended up taking a bit of bribery and about £20’s worth of fish and chips, but I managed to secure a second shoot.

College liked the football supporter with flag image (which i’ve not posted because the model isn’t comfortable with it) and the family on sofa shot.  Although they suggested a similar shot with the kitchen door closed and a few more signifiers (identity clues) around the room.

I also tried to play on the football hooligan a bit more, but I struggled with the location and lighting, it wasn’t ‘dark’ and sinister enough.

Here are my better shots from the shoot:

Again, I took these images to college.  I got very positive feedback on the family shots.  But the shots in the alleyway were too bright and urban.


In the end I decided to hand in the shot that my model doesn’t like and this family shot (I liked the proud look on the fathers face in amongst the other goings on in the room, a final comment from a lecturer was that I maybe needed to sit him up on a cushion to allow for the sag in the sofa, so there is less knees).  I received a Merit for my efforts:

Our 4th and final project for the  HNC Photography 1st year is National Identity.  We have been tasked with producing two documentary style images to portray a national identity.

I chose Englishness.  My brother in law is a very keen football supporter.  He is a Leicester City season ticket holder and gets behind the national team when they are on the TV.  Now i’m maybe being a bit unfair to him, bit with his shaved head he does look a little bit like a football hooligan. This is actually a long way from the truth and he is a wonderful husband to my sister as well as a fantastic Dad to my Nieces.  I thought the football supporter and doting Dad would make a good contrasting pair of images.  After a bit of persuasion I’ve managed to secure a date to go round and take a few shots.  My main inspiration has been Martin Parr a well known English documentary photographer.

Here are some of my better images from the shoot (there is an image that I really like, but the model isn’t keen on, so i’ve omitted it.  It is him from the waist up, topless showing tattoos, holding an England flag behind his head, almost screaming into the lens):

My favourite shots are the one i’ve not shown and the ones of the family sitting on the sofa.

After some discussion with the unit tutor I’d decided to follow the beer can photography route and photograph Leicester landmarks.  I did some research and decided that I needed 5, 10 and 15 second exposures at each landmark to try and cover all bases.  Because it’s very difficult to change the ‘film’ (photographic paper) in a beer can camera without over exposing it, I’d decided I’d take a lot of pre-loaded cans out with me.  Here is my stack of beer can camera’s:

Pinhole tower

I must add that I didn’t drink all of the beer in these cans.  I went to ASDA and bought some smart price larger and bitter 4 packs (only £1.99 each!).

So, last Sunday (21st April) my wife and I went for a bus trip all around Leicester taking shots at 4 locations.  I’d taken the shots, but I wouldn’t know the results till today.

Because i’d happened to book the day off work I’d spoken to the tutors and arranged to go in early, use the darkroom and develop my shots.  I’m so glad I did, everyone was well over-exposed.  I had 12 black sheets of paper for my troubles!

So, I bought some more photo-paper and ran over to the bus station.  Took shots at 1,2 and 5 seconds. Got them back to the darkroom, success!  2 seconds seemed to be ideal for that shot.  So I loaded up my remaining cans and went for a drive around Leicester.  I went to the King Power Stadium, Tigers Stadium, The Space Centre and Abbey Pumping Station.  I then got back to college and was reasonably happy with the results.  These were then scanned, inverted, cropped, tweaked and printed A3.

Below are my final images.  I’m fairly happy with them, although they do lack a lot of definition.  I would have liked to spend more time and perfect the shots, but this wasn’t possible.

King Power Stadium

King Power Stadium

St Margarets Bus Station

St Margarets Bus Station

Abbey Pumping Station

Abbey Pumping Station

Welford Road (Tigers)

Welford Road (Tigers)

Edit:  I received a Merit for this project.

To get some more shots with my fabricated pinhole camera I decided to take it out away from the house.  It didn’t go well.  As I mentioned with my first shots the biggest challenge was changing the photographic paper.  I thought i’d found a solution by taking a black holdall bag out with me.  After taking a shot I would put the camera in the bag, which contained the new paper.  I’d then zip one arm into it, trying to use the other hand to keep the zip shut.  Then change the paper by feel and putting the exposed paper into another light tight bag.  It was a nightmare and very fiddly.  I took several exposures at three locations.  So it was very time consuming.  I must have overexposed nearly every image or exposed them to light while trying to swap paper in the bag.  All of them were either black or or horribly fogged image that I couldn’t work out which location it was from.  To rub salt into the wounds even more some of the decent ones got stuck in the drying machine and got big black marks on them.  Was a real shame.

The local pub, nearly works, best image of the lot.

The local pub, nearly works, best image of the lot.

Canal lock.  Can make out some brickwork and the outline of my wife in the top right

Canal lock. Can make out some brickwork and the outline of my wife in the top right


One camera-less technique that I had read about and was fascinated by was pinhole photography.  This also lead onto Solargraphs.  This is a way of taking a really long exposure image, onto photographic paper, which doesn’t need developing.  I first read about Solargraphs on Justin Quinnell’s website.  I was also pointed in the direction of Tarja Trygg who did and collected a lot of solargraphs from around the world.

The basic idea is to leave a pinhole camera, in my case a beer can (as per Justin Quinnells instructions) facing the direction of the sun so that over the days the scene is exposed and the movement of the sun can clearly be seen.

My exposure was done onto 5×7 black and white photo paper from 3rd March 2013 to 9th April 2013, so just over a month.  When it was done I scanned it, inverted the image and had a play with some of the levels to produce this:

Guinness Beer Can Solargraph

Guinness Beer Can Solargraph

I was so pleased with it.  I couldn’t believe how well it had come out.  Just a bit unfortunate that we live opposite a breakers yard so you can see the cars piled up.  The bright streak across the sky is the sun.  The black is the lead lining type pattern in the windows.  The way the the circular can deforms the picture is also really nice.

After finishing my pinhole camera I decided to try it out.  I’d done lots of research on pinhole camera’s on the internet and had a rough idea of exposure, but needed to take a few shots to get an idea of how my camera performed.

I took a carriage clock outside and tried taking lots of shots with different exposures from 1s to 20s.  Of course I couldn’t see results straight away as I then needed to take the photographic paper into college and use the dark room to develop them.  To compare I then took a picture of the clock on my DSLR.  The final couple of shots on this post are just some I was trying.  I love the vintage look.

A selection of my pinhole clock shots:

Clock 5. ? Seconds

Clock 5. ? Seconds

Clock 2. ? Seconds

Clock 2. ? Seconds

CLock 1. ? Seconds

CLock 1. ? Seconds

DSLR clock shot to compare, obviously it looks a lot better, but i’m still very pleased with the pinhole camera:

Desaturated image taken on DSLR. 100 ISO, f8, 1/200

Desaturated image taken on DSLR. 100 ISO, f8, 1/200

A couple of other shots of the house and garden.  My biggest challenge was changing ‘film’.  My camera can only take one sheet of photographic paper at a time.  So after every shot I had to go into a pitch black room and swap the paper for a new sheet.  The cloudy patchy look of the image could be due to me accidentally expose the photographic paper to light as I was transferring it back into it’s box.  The dark half circles are the drawing pins that were holding the paper in.  Any small black marks are probably dirt on the paper.

Back of the house

Back of the house

View from the back bedroom window.

View from the back bedroom window.

So, while waiting for my Solargraph to take shape i’d decided to build a pinhole camera.  My ‘film’ was again going to be 5×7 black and white photo paper.  I had a dig around in the garage, found some wood, purchased some glue and black spray paint and gave it a go.  I knew I needed a light sealed box with a very small hole at the front opposite the photo paper.  The best way to do this seemed to be make a large hole in the wood, cover with tinfoil and make a hole with a pin.  I also needed a crude shutter.  Below are a few photo’s of my making process:

Mocked up lower section.

Mocked up lower section.

Again, mocked up. First screws to hold it together.

Again, mocked up. First screws to hold it together.

View of the aperture/shutter assembly.

View of the aperture/shutter assembly.

Finished Camera

Finished Camera

This week we tried another couple of non camera photographic techniques.  The first one being a Cyanotype or Blueprint.  Paper is painted with a solution, left to dry and then either items or an acetate print are placed on top and the whole thing exposed to UV light for 15-20 minutes.  The paper is then washed in water and then dried.  I did a fairly simple one onto a piece of paper from my watch project.  I placed some negatives, a protractor and a large paperclip onto the paper before exposing to UV:

Cyanotype

Cyanotype

We then tried a Polaroid Lift.  Because the camera’s are so hard to come by the college has a machine that prints a 35mm negative or an acetate onto a polaroid.  What you can then do is soak the picture in hot water and the image on a thin film comes away from the white card.  There are a couple of things that can then be done with this:

  • The thin film can then be arranged on a piece of card. Either as flat as possible or most likely crumpled.
  • The black paper that is peeled off the polaroid picture can be pressed onto paper and whatever residue is left is transferred.
Polaroid Lift on paper

Polaroid Lift on paper


Polaroid residue left on backing

Polaroid residue left on backing


Polaroid backing residue

Polaroid backing residue